It is recommended to save and run the program in a folder created in a user folder, such as "Documents" or "Desktop", otherwise if it's saved in a folder such as "Program files" it is required to run the program as administrator.
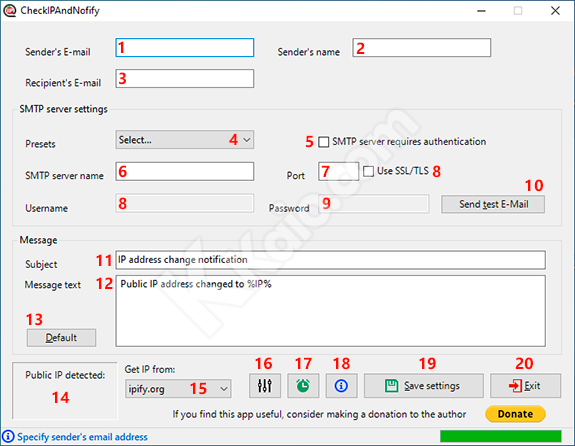
- Enter a valid sender's mail address.
- Enter a sender name, optional.
- Enter a valid email address where to be notified of the change in public IP address.
- Select from the drop-down list a default setting for the SMTP server used, if your provider is not present, or if you want to configure manually, fill in the fields by consulting the SMTP configuration specified by the provider.
- Check the box if the SMTP server requires authentication with a username and password, usually it is required.
- Enter the name of the SMTP server.
- Enter the port of the SMTP server, usually: 465 / 587 / 25, check the box if the server requires a secure connection, usually it is required.
- Specify the username of the SMTP server, usually it is identical to the email address.
- Specify the password associated with the username, NOTICE: if on your email account is enabled the two factor authentication, you need to generate a specific password to use with this app.
- To verify that the settings are correct, click on the button to send a test email, verify that no errors have been generated and check the inbox mail, if the message has arrived, the program is configured correctly (also check junk e-mail / spam if it doesn't appear in your inbox mail).
- By this text box you can change the default subject of the email.
- By this text area it is possible to write a different message instead of the predefined, remember to insert "%IP%" to make sure you receive the IP address in the message body.
- Use this button to restore the default subject and message
- Here is displayed the public IP address detected, with a left click, it will be copied to the clipboard in the format xxx.xxx.xxx.xxx
- Select a preferred public IP detection service or use the custom one, if not specified, you will be asked, the service must return a plain text IP address, otherwise it will be not recognized as valid IP.
- Opens the options window.
- Opens the window that allows you to create the scheduled task in a few clicks.
- Program information and links to this guide.
- Use this after a correct configuration of the program and before creating the scheduled task, save the configuration in an xml file, required for the correct operation of the program.
- Quit the program without saving changes.